A first session feels much less mysterious when the machine, the monitor, and the body are prepared in that order. This long-form walk-through expands the brief above with a step-by-step setup, the reasoning behind each decision, a first 10–15 minute session you can take to the gym, and the small changes that matter for women, older adults, and anyone returning to exercise after injury or pregnancy.
The context
You walk into the gym, the rower sits in the corner, and the monitor is already counting metres from the previous user. There is a strap, a damper, a slider, and a handle that looks heavier than you expect. The temptation is to sit down and pull — to make the screen move, to feel like a workout. That instinct is what we are trying to slow down for the first ten minutes.
Concept2's technique hub puts it plainly: "Don't pull too hard until you are comfortable with the technique fundamentals." The first session is not a fitness test. It is a setup session whose job is to leave you confident enough to come back tomorrow and the day after that. British Rowing's beginner training plan starts Week 1 with "5 × 1 min row at low intensity with 1 min rest" — five short pieces, mostly rest — explicitly framed as "Get used to being on the rowing machine."
The core idea
The first session is split into three problems: place the body, place the equipment, place the effort. Place the body first (foot stretchers, seat, posture). Place the equipment second (damper or drag, monitor, optional heart-rate strap). Place the effort last (stroke rate, splits, watts). If you try to set your pace before your body is set, the monitor will set you up for habits that are hard to unlearn.
Key points
- The first session is a setup session, not a workout — five short pieces at low intensity beat one long one.
- Set up your screens before rowing: ErgData pace boat on your smartphone in the cradle, PM5 force curve on the monitor, and entertainment below.
- Set the equipment before you set the effort: foot stretchers and damper (drag factor 100–130) first, then stroke rate (18–22 spm), then pace.
- Master the recovery order: arms extend and body hinges forward from the hips before the knees bend to avoid bumping the handle.
The how-to
1. Prepare the floor space and your kit
Before you touch the rower, clear the area around it. The Concept2 RowErg footprint is 8 ft × 2 ft (244 × 61 cm) and the manufacturer's recommended clearance envelope is 9 ft × 4 ft (274 × 122 cm); RP3 Rowing recommends roughly 3 m × 1.5 m of clear floor for a home rower, with at least 20 cm in front and 50 cm behind and to each side. Hydrow adds a 12-inch minimum clearance behind and in front of the rower for the same reason — the seat moves, the handle travels, and your legs swing on and off. Lay a mat or a sheet of plywood underneath the front stabiliser if your floor is soft or uneven; rowing machines concentrate load on small feet and a gym floor will mark over time.
Set out a water bottle, a towel, and flat-soled shoes. Most beginners do best in a running shoe with a reasonably thin sole; cycling shoes with a stiff plate are also fine. Barefoot or thick-soled trainers are the two extremes that interfere with foot-stretcher feel. Hydrow's footwear guidance is explicit: laces tied, nothing dangling past the sole, feet strapped in before any stroke.
2. Set up your PM5 monitor, ErgData app, and screens
Positioning your display screens properly ensures you receive real-time pacing feedback from MyNextRow without straining your neck or posture.
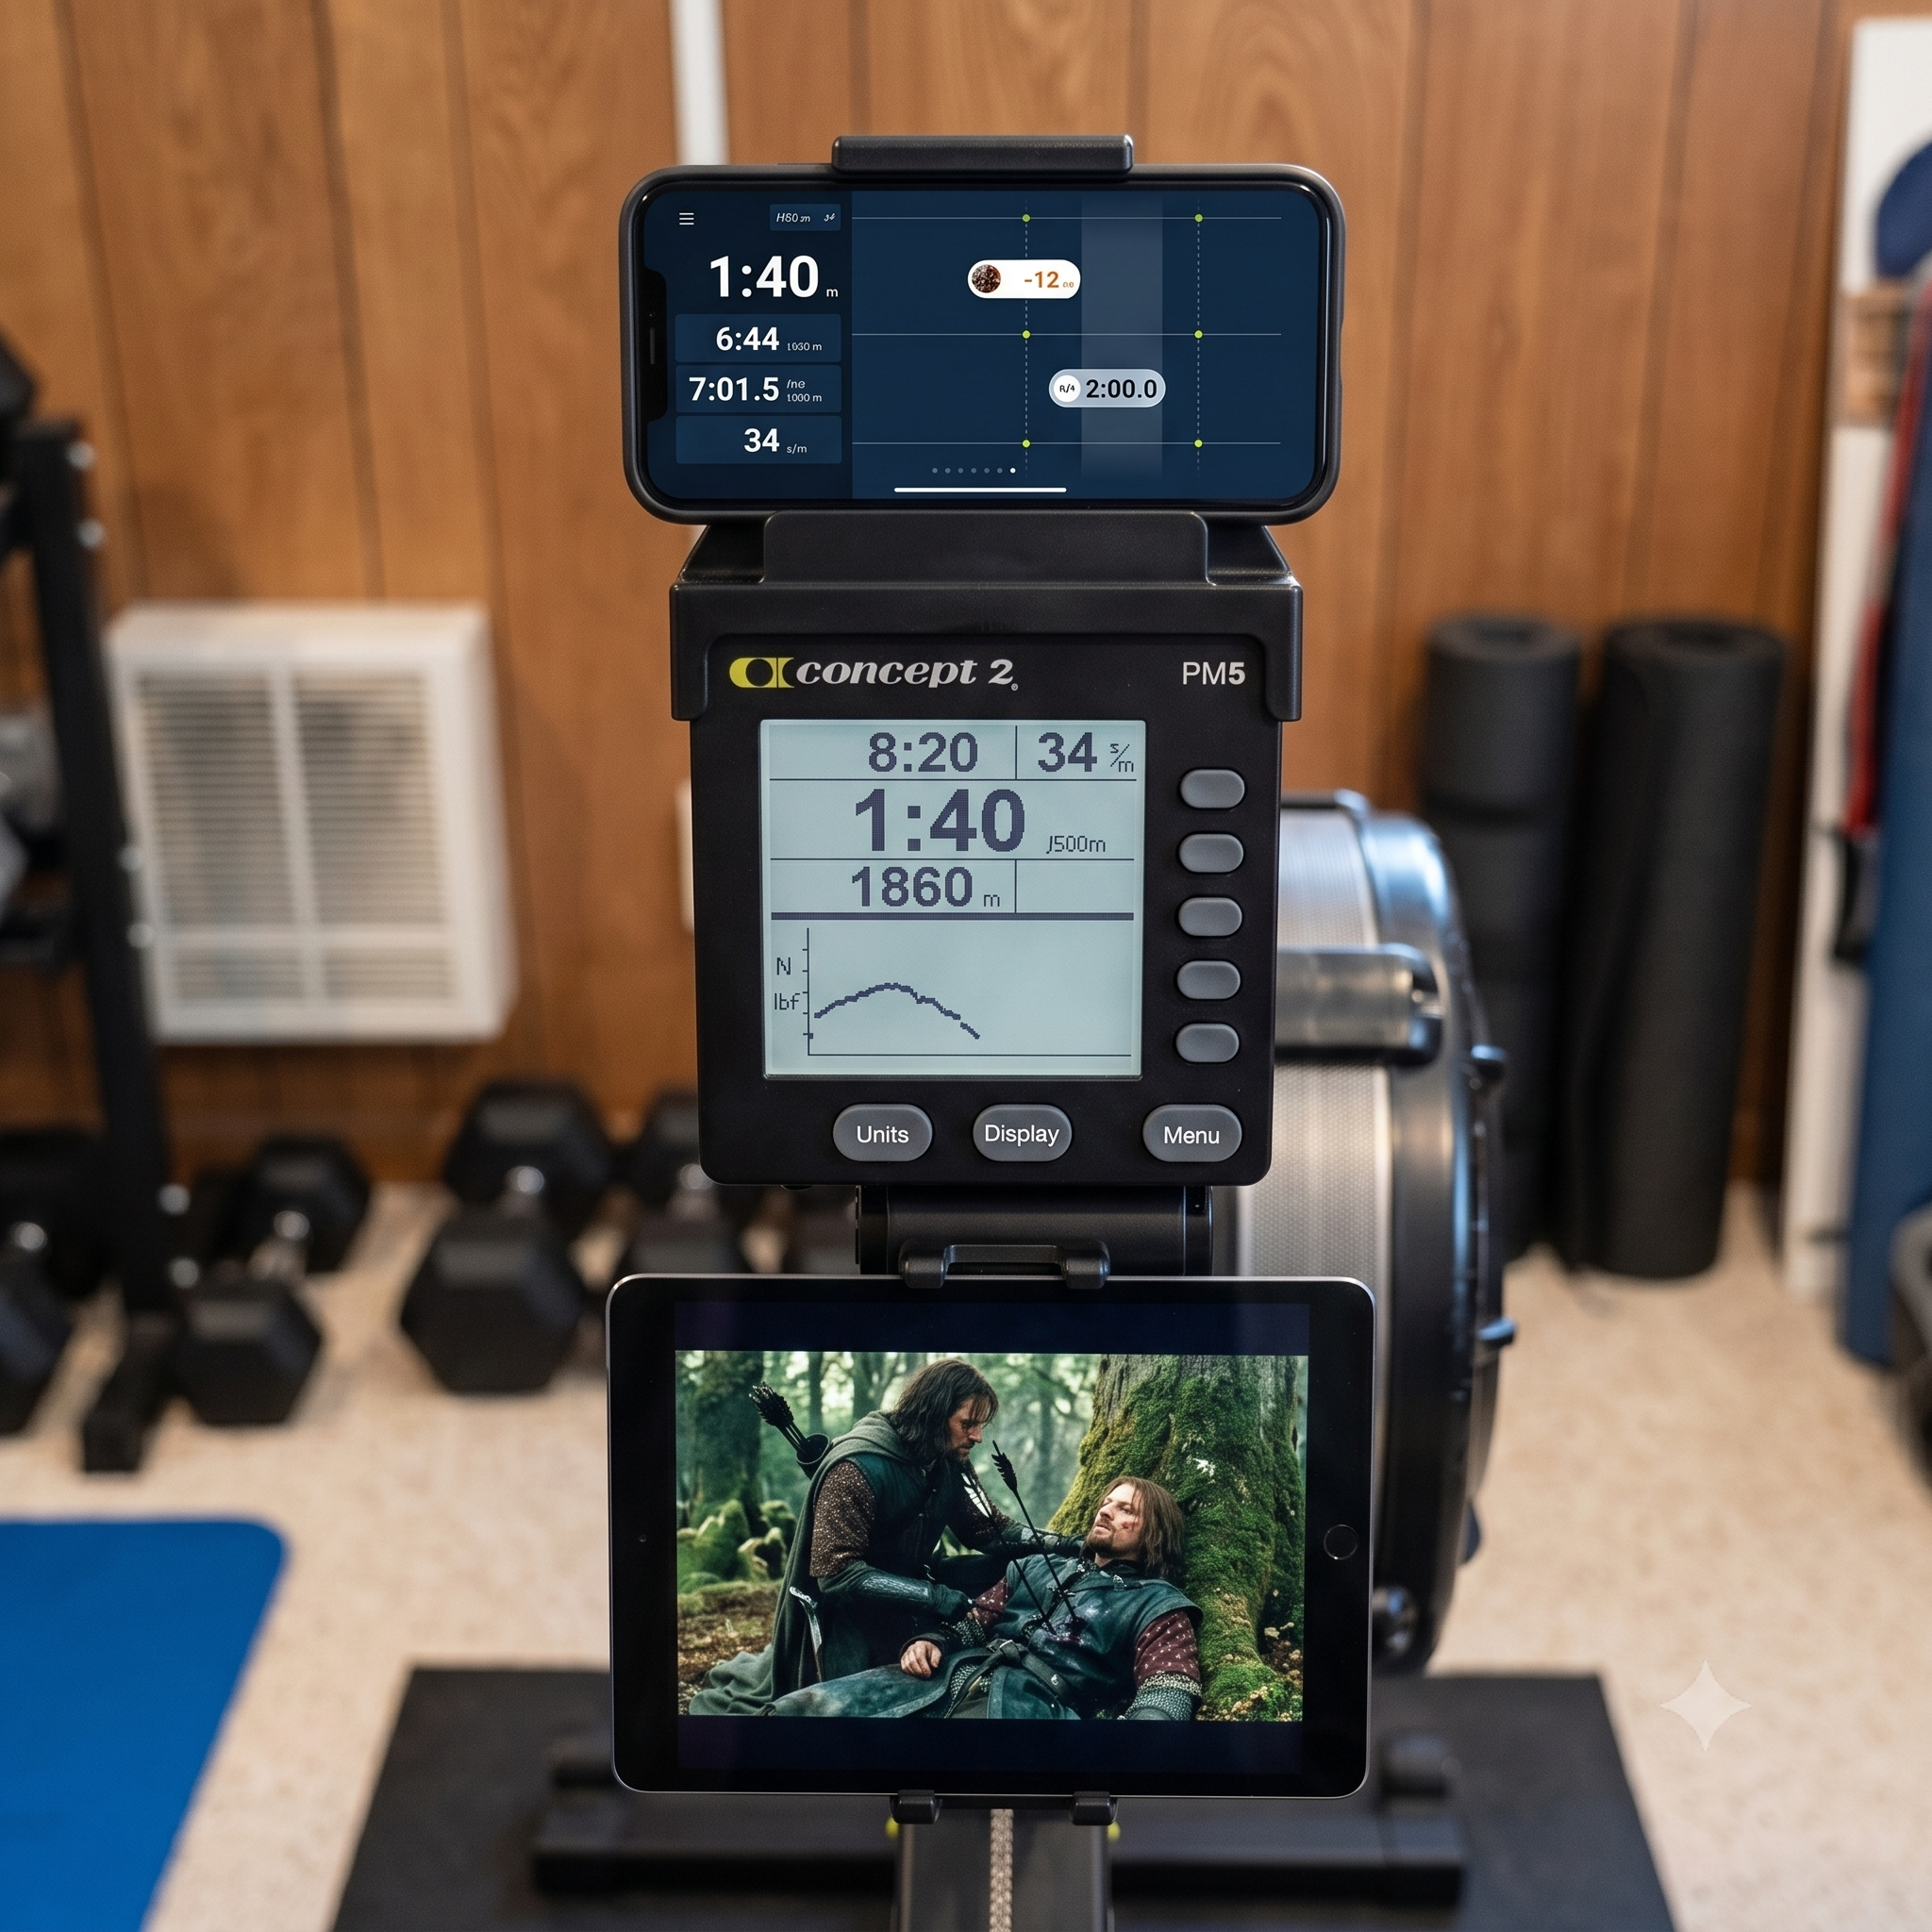
Follow this multi-screen setup for an optimal training session:
- Mount the Smartphone Cradle: Attach the Concept2 Smartphone Cradle (or retrofit device holder) securely to the top of your PM5 monitor and slot your smartphone inside.
- Pair ErgData via Bluetooth: Turn on your PM5 monitor by pressing any button. From the Main Menu, select Connect. Open the Concept2 ErgData app on your smartphone, ensure Bluetooth (and Location Services on Android) is turned on, and select your PM5 ID number to pair. Note that the PM5 connects to one app at a time over Bluetooth — if pairing fails, close other fitness apps and verify the PM5 is not paired directly in your phone's system Bluetooth menu.
- Open Workout & Set Pace Boat: When you tap your workout link from MyNextRow, ErgData will load the programmed target intervals. In ErgData, swipe to the Pace Boat screen (which visualizes your live distance ahead or behind your target pace boat in real time).
- Display the PM5 Force Curve: Press the Display button on the PM5 monitor until the lower half of the LCD screen displays the Force Curve graph. This visualizes your drive acceleration and power profile on every single stroke.
- Position Entertainment Below: Mount or rest a tablet directly below the PM5 monitor running your choice of entertainment (a movie, show, or workout playlist) so you stay engaged without taking your eye line off your rowing form.
3. Mount the rower safely & grip the handle
The mount is the moment most first-session injuries happen. Hydrow's published safety guidance is to bring one foot onto the rower first, then the other, lower onto the seat, then fasten the strap. Use a step stool, a 20-inch box, or the side-mount if the seat feels too high. British Rowing's beginner videos repeat the same sequence: hold the handle in one hand while you sit, swing the legs over one at a time, fasten the strap second. There is no rush; the rower is bolted together and not going anywhere.
Once seated, take the handle from the handle hook. Use a relaxed "hook grip": wrap your fingers over the top of the handle with your thumbs loosely underneath, keeping your hands near the outer ends of the handle and your wrists flat. Avoid a tight "death grip" or squeezing with your palms — tense hands transmit unnecessary strain to your forearms, shoulders, and neck. When stepping off the rower after a piece, always return the handle to the handle hook; never let go of the handle and allow it to snap back against the flywheel chain guide.
4. Set the foot stretchers
The strap crosses the widest part of your foot, not the arch. Concept2's "Find Your Optimal Foot Position on the RowErg" guide is unambiguous: "The strap should cross the widest part of your foot." The Ergatta owner's manual (page 6) phrases the same instruction as "the strap is designed to cross the foot right below the base of your toes"; page 11 specifies "over the balls of your feet, or right over the top of your laces." A strap across the arch lets the foot lift under load; a strap across the toe base lets the heel rise naturally through the stroke without losing connection.
The footboard adjusts vertically, not horizontally, on every Concept2, WaterRower, and Ergatta model I checked. Concept2 uses a heel cup with a single thumbwheel; WaterRower uses a push-button footstrap assembly (US) or peg-and-hook heel rests (M1 upgrade); Ergatta uses a single centre button. Heel-cup height should let your knees track straight over your mid-foot at the catch. A low heel cup forces an early heel lift; a high heel cup collapses your shin angle. Aim for the strap snug enough that you can slide two fingers under it but no more.
5. Pick a damper (or drag) setting and check your drag factor
Concept2's official damper article recommends damper 3–5 for most workouts. The Concept2 "Debunking the Myths" blog puts it more bluntly: "A damper setting of 3–5 is likely to give you the best workout. A damper setting of 10 is more like a slow heavy rowboat — still a workout, but more about strength than cardiovascular fitness." British Rowing's beginner plan is slightly more conservative: "If using a Concept 2 rowing machine, set the damper level to four or below to help maintain good technique." Damper 10 is a strength drill; it is not intensity, and Olympic rowers do not race at it.
On a Concept2 PM5 the relevant number is the drag factor, not the lever position: between each stroke the monitor measures how fast the flywheel slows down and converts that to a single number (around 90 at damper 1, around 200 at damper 10 on a new RowErg at sea level). To check your exact drag factor on the PM5:
- Press Main Menu -> More Options -> Display Drag Factor.
- Take 3–5 normal rowing strokes. The monitor will display your true drag factor (aim for 100–130 for general workouts).
- Adjust the damper lever on the flywheel housing until your drag factor settles in that 100–130 window.
The watts reading on a Concept2 follows the formula watts = 2.80 / pace³ — a 2:05/500 m split is 179 W; do not chase watts until the stroke is consistent. Hydrow and Aviron set resistance through the workout content: on Hydrow the "Drag" you see on screen is electromagnetic and software-controlled, not a manual damper; Aviron offers 16 levels of magnetic resistance, with low-to-moderate defaults aimed at new users.
6. Do the first five strokes at half-monitor-attention
Sit tall. The British Rowing technique page describes the spine as "long" with the shoulders low and level; Concept2's catch page adds that at the catch the shins should be vertical, shoulders in front of the hips, arms extended. Do not think about your split for the first ten strokes; think about three things only — legs drive, body swings, arms finish, in that order, on the way in; and the reverse order on the way out.
Pay special attention to the recovery handle clearance: on the way back to the flywheel, extend your arms completely and hinge your torso forward from your hips before you allow your knees to bend. If your handle bumps your knees on the return, you are bending your knees too early.
Stroke rate is the single most-misread number on the monitor. Concept2's stroke-rate article is explicit: "the intensity of your workout isn't determined by how high your cadence is; it's based on how hard you're pulling." A 24 spm "steady state" rate at low effort is gentler than an 18 spm rate at high effort. For the first session, aim for 18–22 spm — the technique band — and resist any urge to climb past 24 spm until your stroke is consistent. Concept2's "Low Stroke Rates" blog makes the same point from the other direction: slowing down teaches technique faster than pushing up.
7. Run a 10–15 minute first session
The format that has the most evidence behind it is short, easy, and repeatable. British Rowing's Week 1 Session 1 is "5 × 1 min row at low intensity with 1 min rest"; Week 1 Session 2 is "5 min continuous low intensity." Concept2's "Couch to Consistency" plan (six weeks, four sessions per week) opens with 1/2/3/2/1 min pieces with equal rest. Aviron's beginner hub prescribes a 5-min technique warm-up, a 20-min steady pace, and a 5-min cool-down — though that is the goal template, not the first session.
A practical first session, calibrated to feel like the next day's muscles will agree you were moderate:
- 3 minutes easy rowing at 18–20 spm, damper 3–4, attention on posture.
- 4 × 1 minute at 20–22 spm with 1 minute rest in between, damper 4.
- 3 minutes cool-down at 18 spm, damper 3.
That is 11 minutes total, with most of it at low intensity. The Cleveland Clinic RPE (Borg) anchor for "moderate" is 12–14; the British Rowing talk-test anchor is "you can still talk, but not sing." If you cannot hold a short sentence, drop the damper one click or the rate two spm.
8. Cool down, hydrate, log
A 3–5 minute cool-down at 18 spm is plenty. The American Heart Association recommends roughly 16–24 oz of fluid per pound of body weight lost after exercise; the ACSM suggests ~1.25–1.5 L of fluid per kilogram of body weight lost. For a first session that produced little sweat, a glass or two of water is enough. Note your split, your stroke rate, your RPE, and how you felt at 30 minutes, 2 hours, and 24 hours later. The Cleveland Clinic DOMS reference says soreness typically peaks 24–72 hours after unaccustomed exercise, so what you feel tomorrow is the truest readout of today's load.
When you finish your session, return the handle to the handle hook rather than letting it snap forward into the chain guide. If your ErgData app remained paired throughout the workout, your session data will automatically sync in the background to your Concept2 Logbook account and appear inside MyNextRow.
The trade-offs
The advice above is calibrated for a healthy adult on a flywheel rower (Concept2 or equivalent) in a gym or a home. It changes shape in four common situations.
Hydrow and Aviron (and other connected rowers) control resistance through the workout content rather than a manual damper. On these machines the equivalent of "damper 3–5" is "follow the workout" — the screen and the instructor do the calibration. Hydrow ships three first-touch workouts ("First Row," 5 min; "First Stroke," 15 min; "10-Minute Mindful Row") that build on each other; Aviron's Rowing 101 hub recommends a 5-min technique warm-up, a 20-min steady piece, and a 5-min cool-down. The body cues — vertical shins at the catch, "legs-body-arms" on the drive — are identical.
Older adults. The NHS adult physical-activity guidelines endorse 150 min/week moderate activity and advise a conversation with a GP "if you haven't exercised for some time or have medical conditions." A first indoor row session is the right place to honour that advice: shorter pieces, lower stroke rate, and a damper at the lower end of 3–5. The IJSPT scoping review of low-back pain in rowers (Athy et al., 2023) is explicit that two consistent LBP risk factors are prolonged ergometer use over 30 minutes and a history of LBP — so keep the first session under 15 minutes and split longer ambitions across the week.
Returning after pregnancy. ACOG's Committee Opinion No. 804 (2020) says pelvic-floor exercises can begin in the immediate postpartum period and that gradual resumption of activity with attention to pelvic-floor symptoms is appropriate; RCOG and NHS Trust guidance adds a 4–6 week window of avoiding high-impact exercise and heavy lifting, particularly after third- or fourth-degree tears. Indoor rowing is a low-impact activity, but the Valsalva tendency at higher efforts is a real concern — keep stroke rate below 20 spm and the damper at 3, breathe continuously rather than holding at the catch, and clear the return with a clinician.
Known cardiovascular, metabolic, or renal disease. ACSM's pre-participation screening guidance (Riebe et al., 2015) recommends medical clearance before starting an exercise program for anyone with known cardiovascular, metabolic, or renal disease, or with current signs or symptoms suggestive of those conditions. A first session on the rower is part of the program; the conversation with the clinician comes first.
What to do tomorrow
The single smallest next action: do the same 10–15 minute session two days from now. Same pieces, same damper, same stroke rate. Note how the second session feels compared with the first. The Cleveland Clinic DOMS page is correct that first-session soreness peaks at 24–72 hours; if you rowed again inside that window, your body has not finished processing the first stimulus. Two sessions in a week is enough to learn the rhythm; three is better.
The next brief in this category, "How to Adjust Footrests and Straps," goes deeper on foot-stretcher geometry and knee tracking. The brief after that, "How to Read the PM5 Monitor Without Overthinking It," covers drag factor, splits, watts, and heart rate in the language the monitor is actually using.
Set the body first, the equipment second, the effort last — and row two days from now.
Sources and further reading
- Concept2 technique guide— Manufacturer guidance for the basic stroke sequence and rowing vocabulary.
- American College of Sports Medicine— General exercise guidance used to frame safe, progressive starts.
- Concept2 — Find Your Optimal Foot Position on the RowErg— Manufacturer guidance: strap should cross the widest part of the foot.
- Concept2 — Debunking the Myths: Damper Setting, Stroke Rate and Intensity— Damper 3–5 recommended for most workouts; intensity is how hard you pull, not how high the rate.
- Concept2 — Stroke Rate Explained— Rate bands: 18–22 spm technique, 24–28 spm steady state, 30–36 spm intervals.
- Concept2 — Damper Setting— Damper lever is the input; drag factor is the measured output.
- Concept2 — Watts on the Erg— Formula watts = 2.80 / pace³; 2:05/500 m split = 179 W.
- Concept2 — Couch to Consistency— Six-week, four-sessions-per-week beginner plan.
- British Rowing — Indoor Rowing Technique— UK federation indoor-rowing technique hub.
- British Rowing — Go Row Indoor training plans— Beginner plan: Week 1 = 5 × 1 min easy row, then 5 min continuous.
- British Rowing — Beginner Training Plan (PDF)— Damper four or below; explicit technique sequence.
- Ergatta — Owner's Manual (PDF)— Pages 6 and 11 cover footstrap position across the widest part of the foot.
- Hydrow — Getting on and off the rower safely— Step-by-step mount/dismount, step-stool and side-mount alternatives.
- Hydrow — Footwear requirements— Laces tied, feet strapped in before any stroke.
- Aviron — How to Use a Rowing Machine— Manufacturer beginner guide: low-to-moderate magnetic resistance defaults.
- RP3 Rowing — Home rowing machine space— Clearance guidelines: 3 m × 1.5 m comfortable, 50 cm behind, 50 cm each side.
- NHS — Physical activity guidelines for adults (19–64)— Moderate intensity via talk test; 150 min/week target.
- NHS — Physical activity guidelines for older adults (65+)— 150 min/week moderate plus 2+ days strength/balance; GP conversation if previously inactive.
- ACSM — Updating ACSM's Recommendations for Exercise Preparticipation Health Screening (Riebe et al., 2015)— Peer-reviewed pre-participation screening algorithm.
- American Heart Association — Warning signs of a heart attack— Red-flag symptoms during exercise that require stopping.
- Cleveland Clinic — Delayed-Onset Muscle Soreness (DOMS)— Soreness peaks 24–72 hours after unaccustomed exercise; resolves in ~3–5 days.
- Cleveland Clinic — Rated Perceived Exertion (RPE / Borg scale)— Borg 12–14 = moderate; appropriate first-session target.
- ACOG — Physical Activity and Exercise During Pregnancy and the Postpartum Period (Committee Opinion No. 804)— Gradual resumption of activity with attention to pelvic-floor symptoms.
- Royal College of Obstetricians and Gynaecologists — Your Pelvic Floor— First 4–6 weeks: avoid high-impact exercise and heavy lifting, especially after 3rd/4th-degree tears.
- IJSPT — Examining the Peer-Reviewed Published Literature Regarding LBP in Rowing (Athy et al., 2023)— Scoping review: prolonged ergometer use >30 min and prior LBP are the only two consistent LBP risk factors.
- American Heart Association — Being Active When You Have Heart Disease— Cardiac patients should consult a clinician and consider cardiac rehab before starting a new program.
- CDC — Physical Activity Basics— Hydration before, during, and after exercise; 16–24 oz per pound of body weight lost after.
- World Rowing — International Para Rowing Classification— PR1 (arms/shoulders only, mid-section strapping), PR2 (trunk + arms), PR3 (legs + trunk + arms).